databot™ Basic Training

databot™ Modes of Use

databot™ has the ability to pass on the data wirelessly to Vizeey™ OR use its own powerful web server to store it  or broadcast it via web pages. Learn how here!

Overview

There are two basic modes of operation for interacting with sensor data using databot™:  1) Vizeey™ Mode – when you are connected by Bluetooth to a Smart Device and streaming data to our app, Vizeey™ ; and 2) “Server” mode which enables you to connect to a local databot™ 2.0  network using Wi-Fi.  

Vizeey™ Mode

In this mode you connect to Vizeey™ using your Smart Device Bluetooth connection and conduct live experiments.  Sensor data streams in real-time at the rate of 10 samples per second to your Vizeey™ app and can be visualized, recorded, and easily exported for further analysis in your favorite software! 

Server Mode

In Server mode, databot™ creates its own local Wi-Fi Network and also starts its on-board web server.  You can use any Wi-Fi ready device and your favorite browser to access databot™ services through a friendly web interface.

When you connect to databot™’s local network in Server mode you can configure databot™ to store data to internal memory for later download or access other services such as the Environmental dashboard.

Read on to learn more about how to activate Server Mode and access these services! 

Configuring sensor storage using Server mode is useful for when you might be conducting longer term experiments such as an environmental activity when you are taking readings every hour for a few weeks.  You can store this data internally to databot™ then download it all at once for analysis in your favorite software.

Positional Switching Changes Your Mode of Operation!

Vizeey™ Mode

databot™ uses its internal accelerometer to help it decide what mode it is going to be operating in, so it checks its orientation when you’re turning it on.  If databot™ is right-side up when you power it on, it will check the accelerometer data and activate in Vizeey™ mode, ready to connect to Vizeey™.   

In Vizeey™ mode databot™ will be blinking a blue connection light as shown in the picture to the right.

Server Mode


Try this, place databot™ face down and power it on. Again it will check the accelerometer to determine its position and this time it will activate in “Server” mode.

In Server mode databot™ will be blinking a green connection light as shown in the picture to the right.

Using databot™ in Server Mode

databot™ Server: Preparation

Prepare to connect to databot™ by WiFi!  The first step is to find your databot™’s unique address.  You can find this by opening your basic Vizeey™  experiment list in Vizeey™ Mode and running “System Check.” 

Note the ID number, this is your databot™’s unique identification number!

Now, disconnect from System Check, turn off databot™, and turn it back on in Server Mode using the positional switch.   The green indicator light will be pulsing when in Server Mode.

System Check gives you a quick look at your battery level, your current firmware, and your databot™’s unique ID number.

Once you have activated databot™ in Server Mode it is broadcasting a network address that will match its unique ID number as shown above. Connect to it like any network.

Connecting to databot™ in Server Mode

To access databot™ for configuration, connect to its network (databot_Unique_ID) through your network settings.  You can do this with your smart device, computer, etc. – anything that has Wi-Fi networking capability.  Once you  connect to databot™ you can access its web server by putting in the following address into your browser on the connected device:

Earlier Firmware: 192.168.1.160

Curent Firmware: webserver.databot.com

Once connected you will see a web page for configuring your databot™. 

  1. Check the sensors you wish to activate.
  2. Select the sample rate.  This rate is in Milliseconds (ms).  The default rate of 100 ms collects at the rate of 10 samples per second. Higher sample rates are possible depending on the number of sensors and their specific capabilities.
  3. Click the START  button to begin collecting and writing data to databot™’s internal memory.
  4. Click STOP to halt the collection process.

Long Term Collection Behavior

If you will be leaving your databot™ on and collecting data for a longer period of time, you can leave the experiment running (don’t hit the STOP button) and disconnect it from the network. Make sure you do not turn databot™ off as this will stop the experiment.  When finished, repeat the connection steps and when you reconnect your configuration menu will come up still active.  You can now  STOP  your data collection and prepare to download!

Downloading Data

Once you select the DOWNLOAD option databot™ will download the data you have collected in a Comma Separated Values (CSV) file called EXP_DATA.csv.  You will find it in your downloads as shown in the image to the right.  

This EXP_DATA.csv file can now be opened in any software for analysis such as Microsoft Excel, Google Sheets, or Apple Numbers (shown here).  It can also be imported into a variety of other software that you may already be using for data analysis.  

Note: This same file format is used by Vizeey™ so you can easily collect data using the LIVE mode and export this same type of data file for use in other software.   

Ready for SERVER MODE?  Go Forth and Explore!

Extending Your Data Gathering Time

You can plug databot™ into any 5v USB power source – battery bank, outlet, etc. to run long term data collection experiments of days – months.

Sample Rates

The maximum sample rate will vary depending on how many sensors you are collecting data from.  The default rate of 100 milliseconds collects data at the rate of 10 samples per second. If you need higher sampling rates it is possible, for example when using the accelerometer you can set it higher to 50 samples per second.  

Check the data sheets in our Deep Geek section for the specific sensors you are wanting to log or contact us for more details concerning your specific application.  

Environment Dashboard

When in Server Mode you can also toggle between the Sensor Settings menu and a live streaming Environment Dashboard that can be used for monitoring your local environmental conditions including:

  • Ambient Light
  • Humidity
  • CO2
  • VOCs
  • Air Pressure
  • Temperature (external temperature probe port 1)

The Dashboard also generates an Air Quality value based on combing the CO2 and VOC values.  


That’s It!!

Update your firmware regularly as new features are being added to databot™ frequently.  Make sure you are on our mailing list to get regular updates on new capabilities and releases.

Congratulations! 

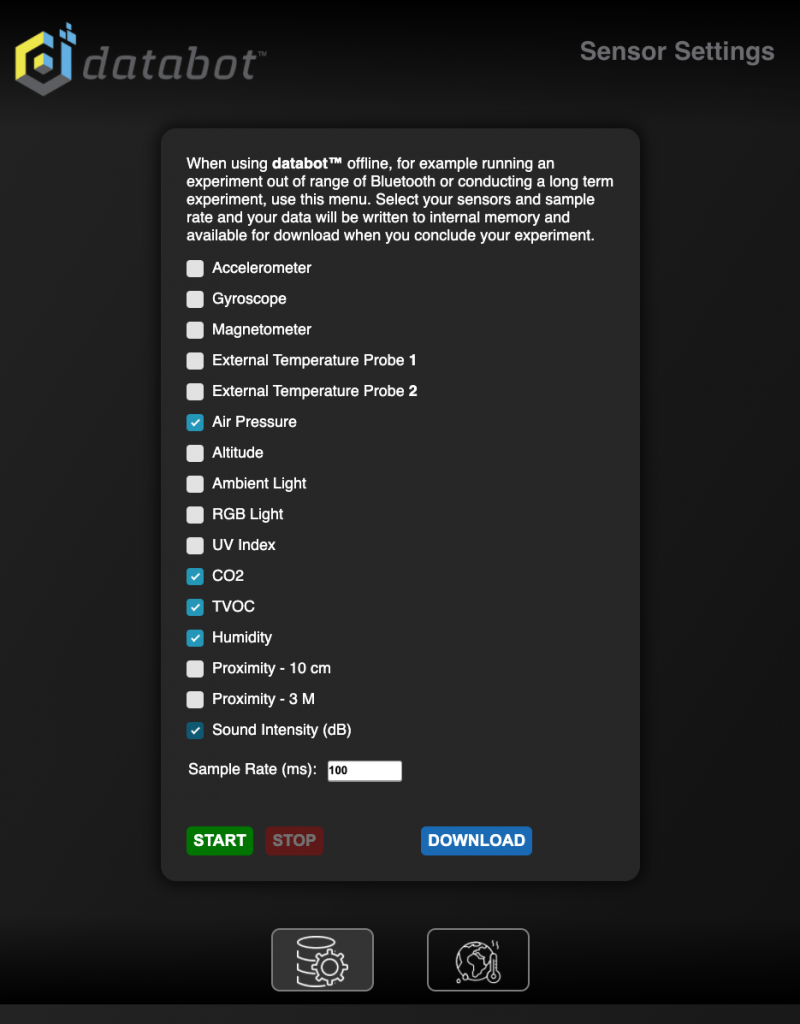
You have successfully completed your exploration of how to enter Server Mode, view dashboards, select sensors and sample rates, store serial data from  databot sensors, and download to your favorite software for analysis.   Now that you are empowered, come up with some exciting ways to use databot to study the world around you and explore data.  Have fun!

To Lessons & More