In this in-depth guide, we’ll cover how to turn your databot into an IOT device using a service called IFTTT (If This Then That). We’ll go through all the steps of connectivity with you to make your databot part of your smart home and automation. Using the IFTTT service, we will learn how to record data from the databot directly into Google Sheets. We will also learn how to get a notification directly to your phone whenever databot sensor readings change. And if you already have smart devices in your home, you’ll be able to add databot functionality to them. Interested? Then let’s get started!
What is IFTTT?
IIFTTT (If This, Then That) is a task automation service that enables the integration of various applications, devices and services to create smart scenarios and automated actions. It is a web-based platform designed to simplify and optimize users’ daily tasks.
How Does It work?
IFTTT’s integration of services and devices can automate routine tasks, save time and simplify the management of various aspects of digital life.
The basic principle of IFTTT is based on the creation of “applets”, which are rules that connect different services. Each recipe consists of two parts: an “if” (trigger) and a “then” (action). When a certain event occurs (“if”), IFTTT triggers a predefined action (“then”). For example, “if” it is evening and the house is dark – then turn on the light.
IFTTT offers a rich library of supported services including social networks, email, smart devices, messengers, blogs, financial applications and others. Users can create their own recipes or use ready-made ones from the library.
Getting Started
Preparation and Materials Required
For this exercise you will need a databot, a mobile device to receive notifications, and Internet access to bring this project to life. Also the desire to make your home more reliable and modern. If you don’t have a databot, you can order one up here.
IFTTT offers a rich library of supported services including social networks, email, smart devices, messengers, blogs, financial applications and others.
You can explore the site’s features, and once you’re ready to begin click “Get Started” in the upper right hand corner.
2. The IFTTT team has made sure that you can register as quickly as possible. You can simply click “Continue with Facebook” or “Continue with Apple”.
3. Congratulations, you’ve registered.
Now you can start working miracles.
4. Click on the “Create” button to create your first automation.
The service is paid, but it also provides the opportunity to make 2 automations for free. This is enough for tests and experiments. Once you have mastered the concepts and tools you can expand your capabilities by paying for the upgrade.
4. Click on the “Add” button to create Applets
5. There are over 800 services on the site. We need “Webhooks”. Just search for “Webhooks” and select it
6. In the opened window select “Receive a web request”
7. Create a trigger name. For example, “databot”. And click the “Create trigger” button.
8. After that, we need to create another action that will take place after the web request.
9. Depending on the service, the result may be different. For example, we will implement the ability to write data from databot directly to Google Sheets. To do this, we select the service Google Sheets
10. In the opened window select “Add row to spreadsheet”
11. Let’s set up our display unit! For this you need a Google account – if you have a @gmail.com address you have one which gives you access to Google Sheets, Docs, and more.
Log in to your account and give permission to change the data in the table. This provides permission to the IFTTT service to record its data there.
You can customize the name of the file that will be created in your account.
Prepare your table format as shown. In this example Value 1, Value 2, Value 3 are the data to be transferred directly from the databot sensors. If necessary, they can be increased or decreased.
Finally enter the name of the folder where the file will be saved.
We will leave everything as it is and continue. Click the “Create Action” button!
Press continue.
Press Finish.
12. Congratulations! Your first event has been created. All that’s left is to click the “Connected” button to activate it.
Now let’s move on to customizing the databot.
2. Connecting Databot
Meet databot
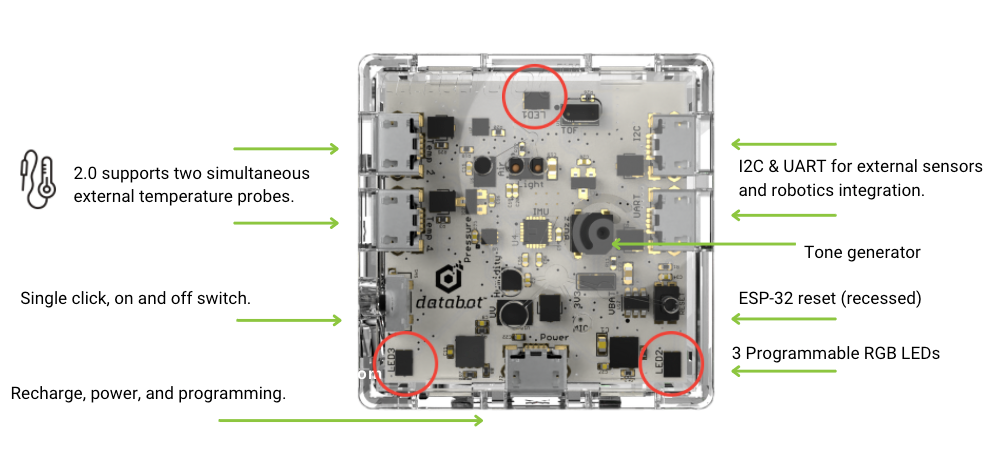
Databot™ is a low-cost, friendly, and engaging all-in-one sensor device that combines 15 internal sensors, 1 external temperature probe (supports two simultaneous probes), Bluetooth low energy wireless, and Wi-Fi to provide a remarkably versatile educational tool for students from grades 4 and up. The sensors on board collect and report data on acceleration, air pressure, altitude, CO2, Color, angular velocity, magnetic fields, humidity, light, sound, temperature, ultraviolet light (index), and volatile organic compounds. It is also capable of sensing proximity to objects within 2.5 meters and detecting gestures as you wave your hand back and forth over it. Amazing!
Now to connect to databot you need the following things:
databot™ (Don’t have databot yet? Get yours here!)
USB Data Cable
Connecting databot to Arduino IDE
If you haven’t worked with databot and the Arduino IDE before, we have detailed staggered instructions on how to do it.
databot reads data from its sensors and sends the data to the IFTTT service by means of a web request.
Our task is to correctly configure what data we will send and how to connect to the service. We have a ready code written in C++. In our code we used 3 sensors from databot. Sensor of lighting, temperature and humidity. You can use any of the sensors.
Download the code at the below link and adjust the settings as decribed below.
Line 23 – the event name must be the name we created on the IFTTT website when we created the request.
Only one thing left, Insert the key from the IFTTT site. Begin on the main page, click “My Applets” (1) and select the Applet we created (2)
Go to the Webhooks icon and select the “Documentation” button
On this page we will see the key we need and the link.
We fill this information into line 24 and 25 in the ArduinoIDE code.
Our code is written to send data every 10 seconds. By further modifying the code you can send any data and with any delay.
Let’s connect databot to the computer and record the code. After we have written the code – go to Google Sheets and the file IFTTT_Maker_Webhooks_Events should appear there.
If you open it, we will see that every 10 seconds new data is added there!
Congratulations. You have finished with the first lesson on implementing IFTTT with databot! The data collected by databot and transmitted via the IFTTT service can be useful for analyzing what happens in your home while you were away. You can tell if someone turned on the lights in the room or how the temperature in the room changed when you were away. In the next lessons we will look at methods to receive notifications and even control the lights in the house. Are you interested? Stay tuned for more!