Arduino iDE

databot as a Universal Sensor for Arduino

Introduction

Today, we will present to you, the most unusual use of  databot. You are always used to that we realize different projects on it, with its help we draw graphs and carry out other activities. We also know that many of you use Arduino microcontrollers. We have been thinking for a long time about how to combine these devices – and we have found a solution: databot as a sensor for arduino. 

How Does It work?

I think a lot of you know how much the databot is a unique device. Such a compact body contains many different sensors. Sensors inside the databot are connected to the I2C bus and exchange information in it. Each sensor has a unique address. Connecting to this address we can read information from it.

But the question before us is how to find out the address of the sensor in this bus. It’s simple, we have a ready table with sensors and their address. 

You can also explore the other insides of the databot by clicking here https://databot.us.com/geek/

Getting Started

For our project, we will need a universal cable that we have recently developed. On one side it has a micro USB connector and on the other side pins that we can connect directly to the Arduino board.

You can also make this cable yourself.
It is necessary to take a micro USB cable with 4 pins and cut it. The cable is arranged so that 2 wires transmit data and on the other two wires power. If you know the basics of electronics and have a little practice in electronics they can easily determine this. Or you can ask the manufacturer for the cable specification.


Use the cable to connect the databot and the arduino.
The databot has a micro usb port. Connect the cable to it. Connect the cable to the acrduino in the following way:

  • Power cable to 5 volts
  • Cable GND to GND
  • SDA to pin A4 on the Arduino.
  • SCL to pin A5 on the Arduino

Now you can supply power to the arduino.
Go to the Arduino IDE and load the code that will allow you to check if you have connected everything correctly.
This is the standard code that checks the address on the I2C bus. We can find it File – Examples – Wire – i2c_scanner
It looks like this

Go to the port monitor and see what addresses the Arduino finds.
If the device cannot find any addresses, try swapping pins A5 and A4.
If you see this, everything is working.

We’re all set. Now let’s move on to the ability to read data from the sensors. To do this, let’s install the necessary libraries.
In our example, we will read readings from the SHTC3 sensor.
Its bus address is 0x70

Library Installation

You can install the Adafruit SHTC3 library for Arduino using the Library Manager in the Arduino IDE.

Arduino iDE

Click the Manage Libraries  menu item, search for Adafruit SHTC3, and select the Adafruit SHTC3 library:

Then follow the same process for the Adafruit BusIO library.


Finally follow the same process for the Adafruit Unified Sensor library:

Open up File -> Examples -> Adafruit SHTC3 -> SHTC3test

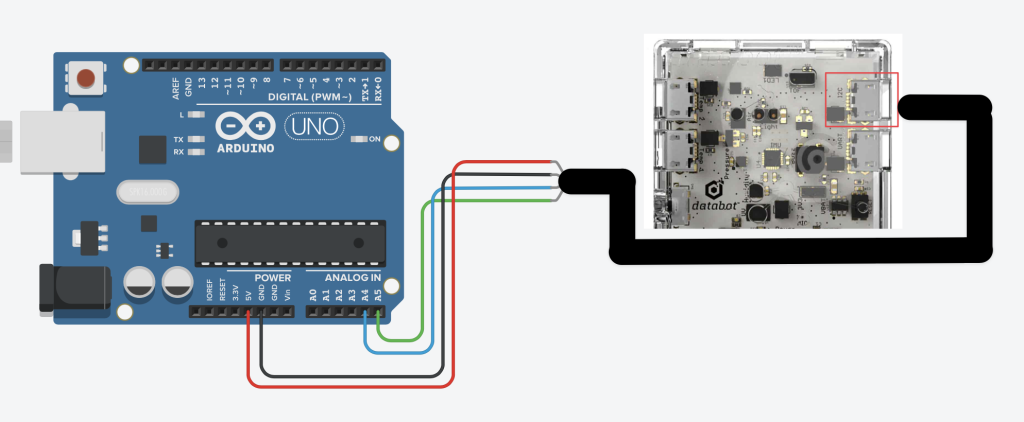
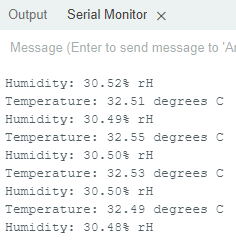
After opening the demo file, upload to your Arduino wired up to the sensor. Once you upload the code, you will see the Temperature and Humidityvalues being printed when you open the Serial Monitor (Tools->Serial Monitor) at 115200 baud, similar to this:

By analogy, you can get data from the databot sensor. Now it is not just a universal microcontroller but also a universal sensor kit all in one.
Buy it and try it.